PSU shroud was up on the agenda. With part of the hard tubes done for the loop I need to connect the loop into the PSU shroud. More precision drilled pass throughs
![Custom PC CMWS19 Coolermaster Zeuligan Unhidden Tribute day 9 pc modding psu shroud 01](https://zeuligan.com/wp-content/uploads/2019/09/cmws19-cosmos-c700p-zeuligan-custom-pc-modding-day7-psu-shroud-01-1024x1024.png)
As it was time to mount the reservoirs to make those connection I also took some photos. Love the feel of acrylic and glass.
![Custom PC CMWS19 Coolermaster Zeuligan Unhidden Tribute day 9 pc modding psu shroud 02](https://zeuligan.com/wp-content/uploads/2019/09/cmws19-cosmos-c700p-zeuligan-custom-pc-modding-day7-psu-shroud-02-768x1024.jpg)
That’s how I will mount them. Changing my straw-loop a little, but to the better.
![Custom PC CMWS19 Coolermaster Zeuligan Unhidden Tribute day 9 pc modding psu shroud 03](https://zeuligan.com/wp-content/uploads/2019/09/cmws19-cosmos-c700p-zeuligan-custom-pc-modding-day7-psu-shroud-03-768x1024.jpg)
Two quick holes with my stepdrill and ready to continue.
![Custom PC CMWS19 Coolermaster Zeuligan Unhidden Tribute day 9 pc modding psu shroud 04](https://zeuligan.com/wp-content/uploads/2019/09/cmws19-cosmos-c700p-zeuligan-custom-pc-modding-day7-psu-shroud-04-768x1024.jpg)
Much better. Small tubes, but enough to show some colant going into the shroud.
![Custom PC CMWS19 Coolermaster Zeuligan Unhidden Tribute day 9 pc modding psu shroud 05](https://zeuligan.com/wp-content/uploads/2019/09/cmws19-cosmos-c700p-zeuligan-custom-pc-modding-day7-psu-shroud-05-768x1024.jpg)
Like that
![Custom PC CMWS19 Coolermaster Zeuligan Unhidden Tribute day 9 pc modding psu shroud 06](https://zeuligan.com/wp-content/uploads/2019/09/cmws19-cosmos-c700p-zeuligan-custom-pc-modding-day7-psu-shroud-06-768x1024.jpg)
This will be a GPU bracket that I will mount ontop of the shroud. It has both screw holes for the riser cable and below that screws for the shroud. Angles are them also fetched from the angle of the exterior of the case. Should harmonize well.
![Custom PC CMWS19 Coolermaster Zeuligan Unhidden Tribute day 9 pc modding psu shroud 07](https://zeuligan.com/wp-content/uploads/2019/09/cmws19-cosmos-c700p-zeuligan-custom-pc-modding-day7-psu-shroud-07-768x1024.jpg)
With the bracket decided I could move on with the corner pass through from the radiator above.
![Custom PC CMWS19 Coolermaster Zeuligan Unhidden Tribute day 9 pc modding psu shroud 10](https://zeuligan.com/wp-content/uploads/2019/09/cmws19-cosmos-c700p-zeuligan-custom-pc-modding-day7-psu-shroud-10-768x1024.jpg)
![Custom PC CMWS19 Coolermaster Zeuligan Unhidden Tribute day 9 pc modding psu shroud 08](https://zeuligan.com/wp-content/uploads/2019/09/cmws19-cosmos-c700p-zeuligan-custom-pc-modding-day7-psu-shroud-08-768x1024.jpg)
Nothing strange. A straight tube.
![Custom PC CMWS19 Coolermaster Zeuligan Unhidden Tribute day 9 pc modding psu shroud 09](https://zeuligan.com/wp-content/uploads/2019/09/cmws19-cosmos-c700p-zeuligan-custom-pc-modding-day7-psu-shroud-09-768x1024.jpg)
Did a quick test with the PSU. This is the main reason for my previous comments about why I wanted the PSU Shroud exactly 130mm up. I need to fit the fittings That will go straight out to the backside.
![Custom PC CMWS19 Coolermaster Zeuligan Unhidden Tribute day 9 pc modding psu shroud 25 GTX 1080Ti](https://zeuligan.com/wp-content/uploads/2019/09/alphacool-gpu-1080ti-rgb-1024x1024.png)
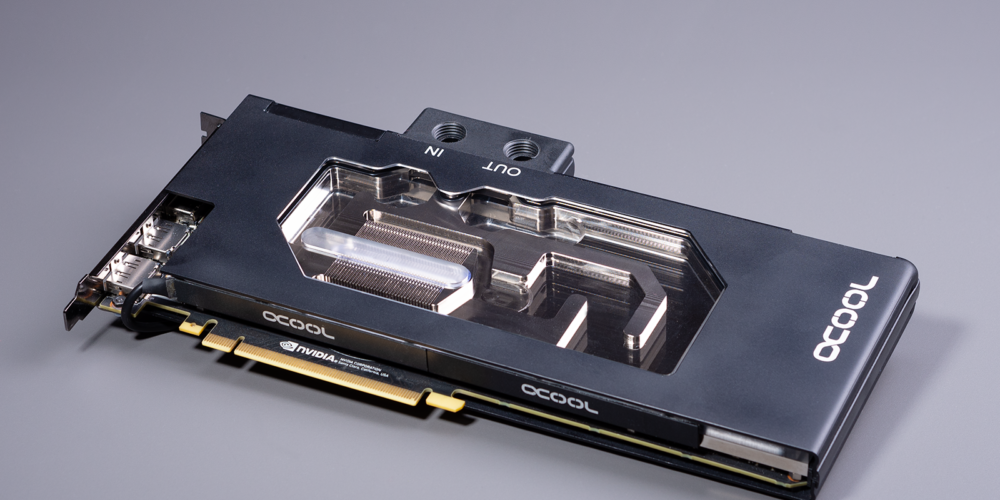
Spent about an hour, with elevated pulse, adding the waterblock to my 1080Ti. That will be perfect. That also passed infront of my camera.
![Custom PC CMWS19 Coolermaster Zeuligan Unhidden Tribute day 9 pc modding psu shroud 11](https://zeuligan.com/wp-content/uploads/2019/09/cmws19-cosmos-c700p-zeuligan-custom-pc-modding-day7-psu-shroud-11-768x1024.jpg)
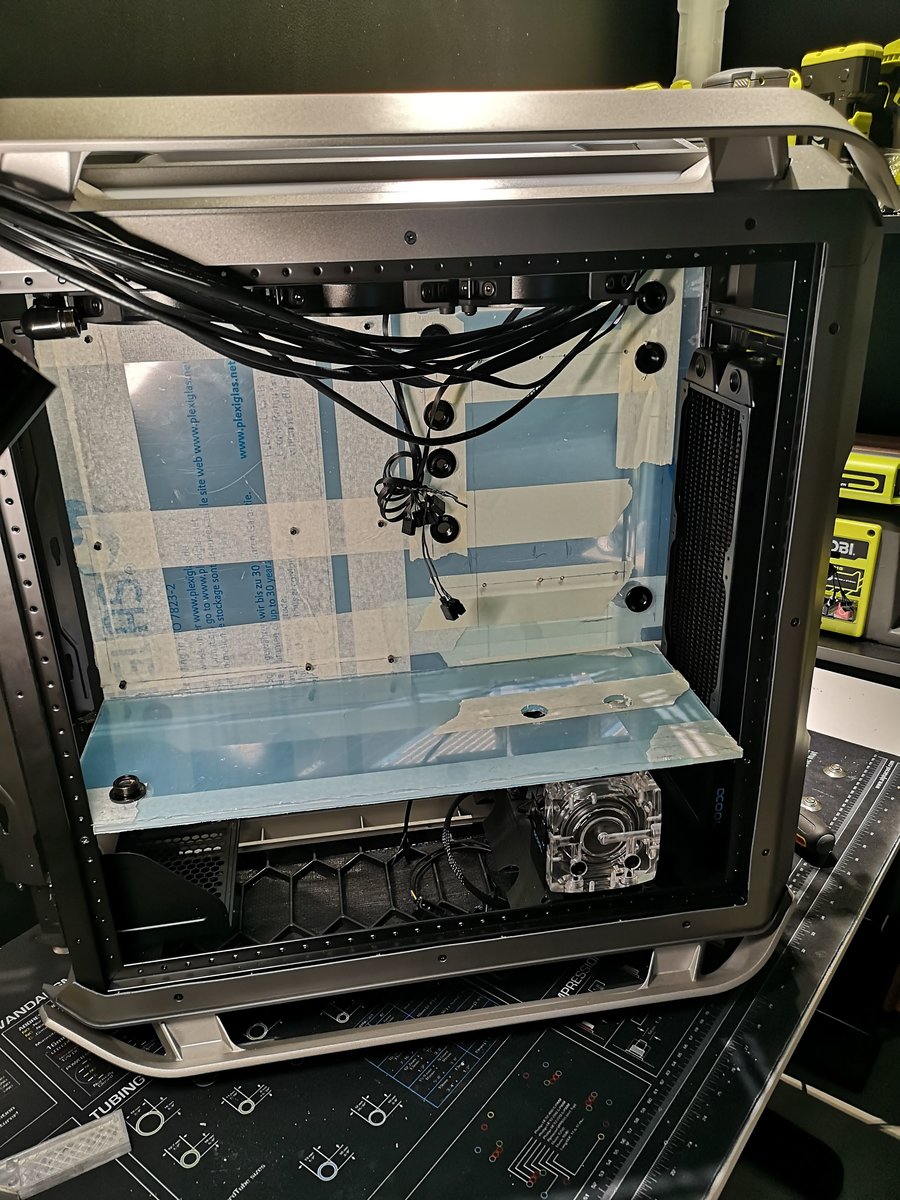
With the waterblock on the GPU I could make measurements for the GPU pass throughs. Thoose two will also “drive” the location of the final pass through. But first I wasn’t happy with the shroud brackets or the obvious problem of adding 1kg+ of weight ontop of a thin acrylic sheet. The sag is real…
![Custom PC CMWS19 Coolermaster Zeuligan Unhidden Tribute day 9 pc modding psu shroud 12](https://zeuligan.com/wp-content/uploads/2019/09/cmws19-cosmos-c700p-zeuligan-custom-pc-modding-day7-psu-shroud-12-768x1024.jpg)
![Custom PC CMWS19 Coolermaster Zeuligan Unhidden Tribute day 9 pc modding psu shroud 13](https://zeuligan.com/wp-content/uploads/2019/09/cmws19-cosmos-c700p-zeuligan-custom-pc-modding-day7-psu-shroud-13-768x1024.jpg)
Redesigned the MB bracket from the backside and did a simular solution for the PSU. But this time also with a 45deg angle to support the upcoming “wall” for the pump enclosure.
![Custom PC CMWS19 Coolermaster Zeuligan Unhidden Tribute day 9 pc modding psu shroud 14](https://zeuligan.com/wp-content/uploads/2019/09/cmws19-cosmos-c700p-zeuligan-custom-pc-modding-day7-psu-shroud-14-768x1024.jpg)
Added a bracket to use in the front, to support the back corner of the PSU
![Custom PC CMWS19 Coolermaster Zeuligan Unhidden Tribute day 9 pc modding psu shroud 15](https://zeuligan.com/wp-content/uploads/2019/09/cmws19-cosmos-c700p-zeuligan-custom-pc-modding-day7-psu-shroud-15-768x1024.jpg)
![Custom PC CMWS19 Coolermaster Zeuligan Unhidden Tribute day 9 pc modding psu shroud 16](https://zeuligan.com/wp-content/uploads/2019/09/cmws19-cosmos-c700p-zeuligan-custom-pc-modding-day7-psu-shroud-16-768x1024.jpg)
Just two standard case screws from the front (making it adjustable in height) and I felt I had a nice solution for the shroud.
![Custom PC CMWS19 Coolermaster Zeuligan Unhidden Tribute day 9 pc modding psu shroud 17](https://zeuligan.com/wp-content/uploads/2019/09/cmws19-cosmos-c700p-zeuligan-custom-pc-modding-day7-psu-shroud-17-768x1024.jpg)
Made a planned update to the back bracket (that will be much bigger and include holes for GPU, PCI slots etc). It also has a vertical slot to guide the motherboard plate. As it’s isn’t the finished plate it’s printed on prototype profile (fast) making it look bad, but printing/modding quicker.
![Custom PC CMWS19 Coolermaster Zeuligan Unhidden Tribute day 9 pc modding psu shroud 18](https://zeuligan.com/wp-content/uploads/2019/09/cmws19-cosmos-c700p-zeuligan-custom-pc-modding-day7-psu-shroud-18-768x1024.jpg)
Much better. That secures the PSU shroud plate, but doesn’t take care of the sag.
![Custom PC CMWS19 Coolermaster Zeuligan Unhidden Tribute day 9 pc modding psu shroud 19](https://zeuligan.com/wp-content/uploads/2019/09/cmws19-cosmos-c700p-zeuligan-custom-pc-modding-day7-psu-shroud-19-768x1024.jpg)
It’s not a permanent solution, but will take care of the support of the GPU for now.
![Custom PC CMWS19 Coolermaster Zeuligan Unhidden Tribute day 9 pc modding psu shroud 20](https://zeuligan.com/wp-content/uploads/2019/09/cmws19-cosmos-c700p-zeuligan-custom-pc-modding-day7-psu-shroud-20-768x1024.jpg)
12h later and after 2h of sanding I had a new GPU bracket. This time with an integrated holder for the lower part of the PCI bracket. It’s not finished, only sanded with 240, 320 and 400 at this point, but already smooth
![Custom PC CMWS19 Coolermaster Zeuligan Unhidden Tribute day 9 pc modding psu shroud 21](https://zeuligan.com/wp-content/uploads/2019/09/cmws19-cosmos-c700p-zeuligan-custom-pc-modding-day7-psu-shroud-21-768x1024.jpg)
Compared to no sanding.
![Custom PC CMWS19 Coolermaster Zeuligan Unhidden Tribute day 9 pc modding psu shroud 22](https://zeuligan.com/wp-content/uploads/2019/09/cmws19-cosmos-c700p-zeuligan-custom-pc-modding-day7-psu-shroud-22-768x1024.jpg)
With the real GPU bracket I could ensure I had the right location and placement compared to the back.
![Custom PC CMWS19 Coolermaster Zeuligan Unhidden Tribute day 9 pc modding psu shroud 23](https://zeuligan.com/wp-content/uploads/2019/09/cmws19-cosmos-c700p-zeuligan-custom-pc-modding-day7-psu-shroud-23-768x1024.jpg)
Testfitted the riser cable, added the GPU and took measurements for the final pass through holes.
![Custom PC CMWS19 Coolermaster Zeuligan Unhidden Tribute day 9 pc modding psu shroud 24](https://zeuligan.com/wp-content/uploads/2019/09/cmws19-cosmos-c700p-zeuligan-custom-pc-modding-day7-psu-shroud-24-768x1024.jpg)
Voila! Starting to feel like a real build. 14 out of the 16 pass throughs hand drilled and in the right place. Tomorrow I will continue with finishing the backside holes and bend some tubes.